Deploying BICEP using Azure DevOps Pipeline

Recently I was more looking into bicep side of things in Azure. And I wanted to deploy the bicep templates using azure DevOps. 😊

I came up with the following workflow to deploy the templates to Azure.

I believe this approach is quite good because

  1. Using the standard approach of build and deploy
  2. I will get to see if there are any errors in bicep files during the build
  3. Saving to artifacts will give the opportunity to go back instantly

Azure DevOps Repository

I will be using a native Azure DevOps repository to hold the bicep code. Feel free to use GitHub also if you prefer.

I have created a new project inside my DevOps organization and uploaded the Bicep code

Build Pipeline

The idea behind this build pipeline is the represent the build stage by compiling the bicep code into Arm template and will be saving JSON file inside the artifacts

Following are the steps

elect your azure repository
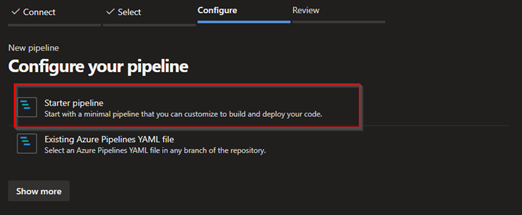
Select Starter Pipeline
Remove the default code
Enter the new Code as above

Note:  Code is saved in my public GitHub. Head out there are and grab it

My yml file does have 2 tasks

Task 1 - Compiling the bicep template into an arm template using Az PowerShell modules

Task 2 – Saving the converted ARM template into artifacts.

Once all done hit save and exit or you can run the pipeline to make sure everything works. Now let’s move to the deploy component

Release Pipeline

In the release pipeline, we will be using the successfully built arm template in the above-mentioned phase to deploy it to Azure. We will be selecting the ARM template from the Artifacts location and will be adding the ARM template deployment job.

Let's look at how we can achieve this


Create a new release pipeline
Select an Empty Job
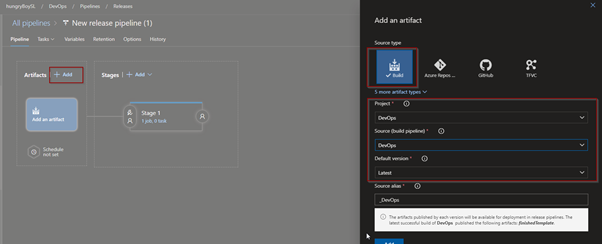
Add new Artefacts and from the drop down select the build pipeline details
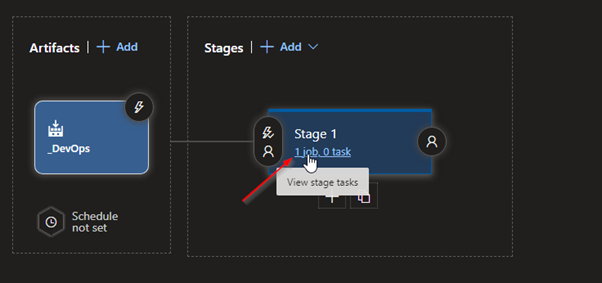
Select Jobs
Add a new job and select ARM template deployment
Select the selected job and fill the required details for you AZ subscription. Filled form is below.
Note: When selecting the template section in the form you can hit the 3 dots in In front of the text box and select our artefacts as below

Note: When selecting the template section in the form you can hit the 3 dots in Infront of the text box and select our artefacts as below

Once done you are done with the configurations. Simply you are run the build pipeline and then the release pipeline. Based on the configurations you select your deployment will get completed.

If you have any questions, please comment down below. Will get back to you as soon as possible


Comments

  1. Hi.
    You dont need to convert BICEP to ARM json. The Azure resource manager knows about BICEP file. So you can give the BICEP file directly to deployment. The ARM converts BICEP to JSON automatically.

    From a CI perspective - i would just do a bicep build - just to make sure that i dont have compilation errors. I would package all the bicep file required in CI step.

    In CD you will pull down the package and call az deploy with bicep file passed as input.

    Just thought of sharing the info.

    ReplyDelete
  2. Hey Lohith,

    Totally agree with you, There are many different way to do it. What you have explained is also a very good method of deploying. Thanks for sharing :)

    ReplyDelete
  3. […] Deploying BICEP using Azure DevOps PipelineDanidu Weerasinghe provides his experience deploying a Bicep template via build and deploy Azure DevOps pipelines. […]

    ReplyDelete
  4. […] Deploying BICEP using Azure DevOps PipelineDanidu Weerasinghe provides his experience deploying a Bicep template via build and deploy Azure DevOps pipelines. […]

    ReplyDelete
  5. […] Deploying BICEP using Azure DevOps Pipeline Danidu Weerasinghe provides his experience deploying a Bicep template via build and deploy Azure DevOps pipelines. […]

    ReplyDelete
  6. […] Note – I have already discussed how to deploy bicep using Azure DevOps in of my earlier posts […]

    ReplyDelete

Post a Comment

Popular posts from this blog

Deploying an Automation Account with a Runbook and Schedule Using Bicep

Introduction Automation is a key component in many organizations' cloud strategy. Azure Automation allows you to automate the creation, deployment, and management of resources in your Azure environment. In this post, we will walk through the process of deploying an Automation Account with a Runbook and Schedule using Bicep, a new domain-specific language for deploying Azure resources. Intention My intention at the  end is to run a PowerShell  script to start and shutdown Azure VMs based on tag values. PowerShell  script that I have used is from below l ink.  And two  of me   collogue s ( Michael Turnley   and Saudh Mohomad helped to modify the  PowerShell  script. Prerequisites Before we begin, you will need the following: An Azure subscription The Azure CLI installed on your machine. The Azure Bicep extension for the Azure CLI Creating the Automation Account The first step in deploying an Automation Account with a R...

Securing Azure Services with Fetian FIDO

Hey Folks  Here again with another security topic with Fetian Fido. And once again Fetian devices proved their excellent quality and stability. For this I choose Fetian K33 -  AllinPass FIDO Security Key – FEITIAN (ftsafe.com) and  K39 -  Single-button FIDO Security Keys | FEITIAN (ftsafe.com) Use case  In an organization following changes needs to be implemented.  1. Update the password policy 2. Update the user session time out to 30 minutes Once these changes being implemented, the following issues need to be addressed 1. Users' complaint new passwords need to be so long 2. Users complain sessions time out makes them work so much slower with the longer passwords 3. Etc... Solution  One of my friends reached out to me to help solve this problem. All I could think of was using passwordless auth with FIDO devices. We have decided to use Fido2 keys for better security and flexibility for the users. The FIDO (Fast IDentity Online) Alliance helps to pro...

Migrating Azure DevOps Variable Groups

Howdy Folks, I was working on an application modernization project. And there was a requirement to migrate application deployments from one project to another in Azure DevOps. deployment pipelines were heavily dependent on variable groups. So, we wanted to migrate these variables group to the new project. Couldn't find any solutions in internet for this, so came up with the below scripts. You can grab the scripts from the below GitHub URL. DaniduWeerasinghe911/Migrate-Azure-DevOps-Variable-Groups: This Repo Include PowerShell Scripts relating to Migrating Azure DevOps Variable Groups (github.com) Azure DevOps Variable Groups Azure DevOps Variable Groups are a way to store and manage sets of variables that can be used across multiple pipelines in Azure DevOps. These variables can include secrets, connection strings, and other sensitive information that is needed for builds and releases. Variable Groups provide a centralized way to manage these variables and ensure that they are cons...